Building a Homelab - Introduction
August 29, 2026 - 2751 words (11 mins)
As the saying goes, The Cloud is really just Someone Else’s computer.
You might be looking at your phone - the “supercomputer in your pocket” - but as you edit online docs, read e-books or stream music, you’ll find yourself mostly using the computing power of Google, Microsoft, Amazon, among other companies. Although the processing power of phones and computers continues to increase, the trend among users points towards further reliance on the subscription-based services of The Cloud.
I find this to be unfortunate. It means we trade away our digital sovereignty - the control and ownership of our data. Our precious documents, photos, and conversations are placed at risk with companies that don’t even provide a phone number for account support or recovery. Along the way, we also lose our grasp on what personal computers are, how they work beyond a surface level, and what they can do to empower us as individuals.
By building a Homelab - a personal cloud using hardware and software you own - you can take back control and privacy of your data, learn valuable skills that can help you build a career, and pull back the curtain behind how the modern internet works.
This article is the first in a series on building a Homelab, and the journey I’ve taken while building mine. We’ll start with an overview of what a Homelab is and why you might (or might not) want to build one, and in future articles we’ll cover the more technical details of setting one up.
Table of Contents
What is a Homelab?
At its core, a Homelab is just a bunch of computers and software that runs on your home network. Some such computers might run software that you can connect to from your phone or laptop web browser, just like you can with Google Drive or Netflix. Other computers might control some household smart devices for you. Yet others will work to keep your data safe by synchronizing between devices and backing it up.
This is similar to how the wider internet works. You can think of Google Drive like a computer somewhere on the internet with a big hard drive, running some software that a user can connect to to upload or download files. Of course, in reality such systems are much more complicated as they must serve billions of users.
You can’t download the software that runs on Google Drive or Netflix servers - these are proprietary, closed source applications that may only run on specialized distributed systems. You can download open-source alternatives though, like NextCloud or Jellyfin. These alternatives can provide similar services to those you use everyday, and you can run them on your own computers. Instead of connecting to the Google Drive or Netflix computers, you’d connect to your own instead.
Large cloud providers use multi-billion dollar datacenters and hardware because they need to serve billions of users. A basic Homelab doesn’t need much more than a few hundred dollars in hardware - maybe less if you already have something like a Raspberry Pi, or can find an old or second-hand computer lying around.
Why Build a Homelab?
Control
One of the most compelling reasons for building a Homelab (other than to brag about it on Reddit) is retaking control of your data.
Imagine you have a decade-old Google or iCloud account, which stores years of documents, photos, emails, and media purchases. What would happen if your access to the account was locked out? Many fear malicious actors would do this, but the cloud owners themselves can and do permanently ban users for alleged terms-of-service violations1. Those that are innocent face an excruciating uphill battle for restoring their account, which can take weeks to years - some never get their access back.
A total lock-out is the worst case, but there are other risks too - the cloud provider can change the terms of the sale by suddenly restricting features2, they could increase the prices to a level you can’t afford3, or they could rescind previous purchases due to licensing agreement changes4.
Only by owning your hardware and software can you truly own your data. Building a Homelab places the benefit (but also the burden) of control back on you.
Privacy
Major Cloud providers have privacy policies that outline how they do and do not use your data. Ultimately, you must choose to trust them because the server software they use is proprietary and cannot be audited by the end user. The Cambridge Analytica scandal5, Snowden leaks6, and the recent news about Flock Security camera data abuse7 have shown that not all stated policies are enforced or abided by.
When you run open-source software, you, someone you trust, or the community as a whole have the ability to audit the operation. Running that software on hardware you control allows you to ensure that the end-to-end stack is only running software you choose and trust.
Learning and Enjoyment
The field of Homelabbing is an iceberg. You can get tremendous value out of doing the top level, high impact actions, but if it appeals to you there’s an entire rabbit hole to fall into - networking, firewalls, distributed services, Linux, sysadmin, building your own hardware, and so on. You can build skills that can help you in your current career or help you enter a new one.
It can also be fun to adjust and tweak more elements of your digital life! When I got my first iPod Touch, the running joke among my friends and family was that my favourite app was the Settings - if that resonates with you, Homelabbing could be a fun ride!
Showing Off On The Internet
I’ll be honest, when I first was looking into building a Homelab, the project showcases on r/homelab8 actually turned me off the concept. I couldn’t understand why people were building corporate-looking server racks for their homes. What possibly are they doing that requires that kind of hardware, racking and so on?
I learned the answer lies somewhere between “deliberate emulation of enterprise environments” and “cosplay for computers”. I’ve come to respect both as valid pursuits which appeal to different people. As I mentioned earlier, this is supposed to be fun and everyone has their own journey!
Don’t be intimidated by those projects though. You can see below what my homelab looks like - a pile of hardware somewhat hidden in my living room. One day, I too might 3D print racking, install RGB lighting, program an OLED status screen… hmm, okay, I need to finish this article before I start another project…
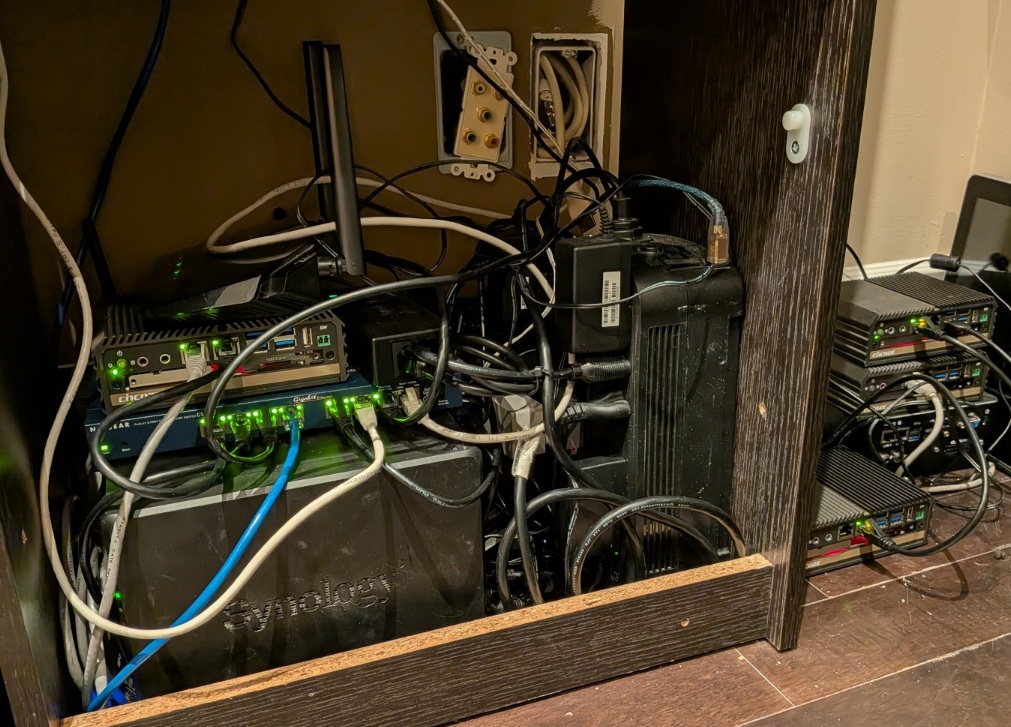
Luckily for everyone, this birds nest is typically hidden behind a front panel that was removed for this photo.
Considerations and Solutions
Every year, thanks in large part to open-source software communities, building a Homelab becomes accessible to more and more people. While I wish it were the case, building a Homelab is not yet for everyone. As I alluded to earlier, the flipside of the benefits of control are the burdens - you are responsible for hosting and protecting your data.
Thankfully, if you follow best practices, this doesn’t require an on-call team of computer engineers or cyber security experts.
Costs
For all the sourness surrounding subscription costs of The Cloud, running hardware and software does cost money.
- Initial hardware costs: computers, network equipment, backup storage
- Ongoing hardware maintenance (e.g. replacing drives, upgrades)
- Marginal increased electricity cost
- Subscription for self-hosted software (e.g. Plex, Emby Premier) or off-site backup services if you choose to use them
Luckily, for many tasks high-calibre computer hardware is not required, especially if you are serving just yourself or a small group. For example, my home router/firewall runs amazingly on a MiniPC with a processor from 2016 and 8GB of RAM.
There’s generally a trade-off between hardware cost and power efficiency when considering the age of hardware to buy. You could buy a capable 10 year old computer second-hand for cheap, but it may consume more energy than a modern MiniPC with a higher sticker price. Your hardware will likely operate near-idle most of the time, and fanless MiniPCs have an advantage over regular computers in idle power consumption.
Storage is unfortunately an unavoidable cost - you’ll need to pay for both active (hot storage) and backup (cold storage) drives, as well as replace any if and when they degrade.
If you can afford the upfront expenditure, there’s a path to breaking-even over time9 compared to paying for The Cloud. You also don’t have to buy everything all at once - I’ve been slowly building, testing and upgrading for over 5 years. I’ll outline some example setups and their associated costs in a future article about hardware.
Protection
Most people would want to access their Homelab from outside their Wi-Fi network. That way you can use your music collection on your commute, read your RSS feeds in the lunch room, or have your phone sync photos while on a vacation. This means that your network must somehow be open to communication from the outside world.
The unfortunate reality is that hackers from around the world are constantly scanning arbitrary IP addresses and looking for vulnerabilities to exploit. The internet is a Dark Forest10 - the quieter you are, the less of a threat hackers pose to you. Luckily, modern firewalls and VPN servers offer the ability for your network to look completely invisible if probed by outside sources.
The safest way to access your network from the outside world is to run your own VPN (virtual private network) server, which you’ll connect to with a client device. Properly authenticated devices will be able to access the network anywhere as if they were home, while anyone else wouldn’t even know your system was there. You’ve probably heard countless advertisements for VPN services on YouTube or podcasts - these are services that live in The Cloud - all your traffic goes to Someone Else’s computer. Now you’ll run your own, and you won’t need an advertising budget. We’ll go over setting up a Router/Firewall with a VPN server in a future article.
Sometimes you may wish to deliberately open services to the outside world, like a website, email, or game server. You can do this with your homelab, but it increases your risk. There are ways to mitigate it, such as Cloudflare Tunnels or the use of a VPS. We’ll cover that in a future article about running services.
Backups
There’s not much extra to know here, because you’re already keeping backups of all your data, right? Right?11
If you went “uh-oh…” just now, it’s okay. You can get the full benefit by starting any time - right up until the minute your cloud accounts are locked out, your hard drive fails, or (God forbid) a house fire, flood or thunderstorm destroys your server.
Start by following the commonly cited 3-2-1 rule:
- 3 copies of your data
- 2 different storage devices
- 1 copy off-site
Here’s an example of what this could look like:
- Copy 1: Live data on your PC or Phone
- Copy 2: A synchronized version of that data stored on your Homelab server or network-attached storage (NAS)
- Copy 3: A set of one or more external hard drives with encrypted backups of your server that you keep at work OR store on The Cloud (e.g. Backblaze, AWS Glacier)
Following the 3-2-1 rule protects you against different threats. Imagine that instead of an offsite backup, you configured your server to simultaneously mirror files across two drives instead of one (commonly called RAID). In this case, a fire or theft affecting your home could threaten both your phone and server equipment, leading to the loss of all your data12.
Perhaps counter-intuitively, I think using a backup service from The Cloud is viable; if encrypted your data remains private, and by controlling two other copies of the data yourself, you are no longer at the whim of the cloud providers. If you are ever locked out, you still control two copies and can rebuild the third with another service.
For most people, setting up a proper and automated backup system is the most powerful step you can take towards data sovereignty. If you do nothing else, start making backups of your data now.
In a future article, I’ll cover my backup strategy, which uses two NAS devices in two physical locations, linked together and kept automatically in sync.
The Road From Here
This article has been a brief introduction to the “what” and “why” of building a Homelab.
I’ve wanted to write about my Homelab for a long time, but there’s so much to cover I needed to split it into multiple articles. Here are the articles I’m planning in this series - I’ll update the links as I publish them. They may not come out in this order, and I may publish other articles in between.
- Firewall, Router and VPN Setup: Build your digital defense, secure your gate, and access your network remotely.
- Backups and Data Storage: Building or buying a NAS, setting up and automating backups, and connecting to an off-site unit.
- Running Services: Cool apps that you can deploy such as Immich, Jellyfin, Home Assistant and FreshRSS. Install them directly on a machine, or as a virtual container on one device (or a cluster)
- Advanced Firewall and Network Topology: Isolate your “smart devices” from the internet, and your guests from your main network. Extend your Wi-Fi seamlessly across a large space or multiple floors.
- Internet-Facing Services: Using Cloudflare Tunnels or a VPS to reduce your risks when running services you want the public to access
- Advanced Home Assistant: Local or OpenRouter-based AI assistant with Raspberry Pi voice control satellites to replace Google Gemini and Google Home
Start Now
Consider the cloud services you currently use and pay for. How much are you paying for them? What if you were locked out from them? Is the data you store in The Cloud your only copy?
See what kind of hardware you have lying around and keep an eye out at thrift stores or online marketplaces for cheap prices. A MiniPC, especially one with two ethernet ports, might just be the start of your Homelab journey, as this is exactly what we’ll use to build our Firewall Router in the next article.
If you have the storage, you might want to take your first backup of your cloud services. Here are a few links to start exporting a copy of your data with various services:
Data Export Links
If you want to jump into the deep end right away, you might want to check out this write-up of the presentation FUTO Introduction to a Self-Managed Life . It’s a very long read, and quite opinionated. It’s presented in a more complicated manner than my future articles will be, but it contains a lot of wisdom hard-won from experience. Although there’s not a lot of overlap with how I set up my Homelab, reading (or well, skimming…) that presentation gave me good background and was a major source of inspiration that started me on my journey.
To get notified of future articles, subscribe to my RSS feed to get updates in your newsreader (Here’s how! ).
-
A father’s photo of his child taken at the request of a doctor and stored in Google Photos was scanned and wrongly flagged as illegal. Despite being cleared of any wrongdoing by a subsequent criminal investigation, Google refused to reinstate the account . ↩︎
-
Google discontinued cloud functions of older Nest thermostats ↩︎
-
Netflix subscription costs have doubled in a decade ↩︎
-
Sony deleted hundreds of “purchased” titles from PSN accounts with no refund ↩︎
-
https://en.wikipedia.org/wiki/Cambridge_Analytica#Privacy_issues_and_investigations ↩︎
-
https://en.wikipedia.org/wiki/Flock_Safety#Misuse_by_law_enforcement ↩︎
-
Top posts of reddit.com/r/homelab . There’s a flair called LabP*rn I wanted to link but I don’t want to get downranked for that word… ↩︎
-
We’ve all tried to convince someone with that line before. Including ourselves… ↩︎
-
Coined by the excellent book of the same name by Liu Cixin ↩︎
-
Right??! ↩︎
-
This situation exemplifies why RAID is not a backup . RAID is better considered as a high-availability measure; your data is still available during the 24 nail-biting hours where you run to the store for a new drive and allow the NAS to rebuild the storage pool. ↩︎