First Steps Into The Mesh
May 15, 2026 - 2839 words (11 mins)
Imagine an encrypted text communication network that is owned by you and your community, one that requires no subscription fees, works with little or no connection to the power grid, while serving as a gateway into meeting interesting new people and building skills in electronics. This is mesh radio!
With mesh radio, you can send and receive text messages across a city - not by relying on a cell company or service providers, but instead by bouncing messages between other low cost, license-free radios operated by members of your community. Your message takes multiple hops between other users’ devices, and the contents remain encrypted all the way to the recipient.
Two friends from across town can send messages by bouncing the packets between other radios in range of each other.
Meshtastic and Meshcore are two common mesh radio systems you can get into today, with minimal upfront cost and experience. Read on to learn more!
Table of Contents
Why Mesh Radio?
Mesh radios can be used as a primary communication method between groups while hiking, sailing or operating in an area with no cell coverage. During natural disasters or other emergencies where cell services or the power grid are down, mesh radio can serve as a backup communication method, especially since the infrastructure to run it is decentralized and can even be run on solar energy.
Meshtastic and/or Meshcore may already have a large existing community near you! Once you’ve decided to buy some low-cost hardware, you can easily swap between firmware to test each system out.
Starter Hardware for Meshtastic and Meshcore
Mesh communications take place with a radio system called LoRa (LongRange). Cell phones don’t have this type of radio circuitry, so you need special hardware to send messages from your phone. Here are some products that are ready-to-go. (I’m not affiliated with any of the manufacturers linked in this article).
- The SenseCap Card Tracker is a low profile, weather-resistant, battery-powered node that you can clip to your backpack and connect to with an app on your phone.
- The LILYGO T-Deck is like an off-grid Blackberry. Instead of connecting your phone to a board, you can compose and read messages directly on the device.
If you want to jump right in, pick up one of these and check out the getting started guides for Meshtastic or the Meshcore FAQ .
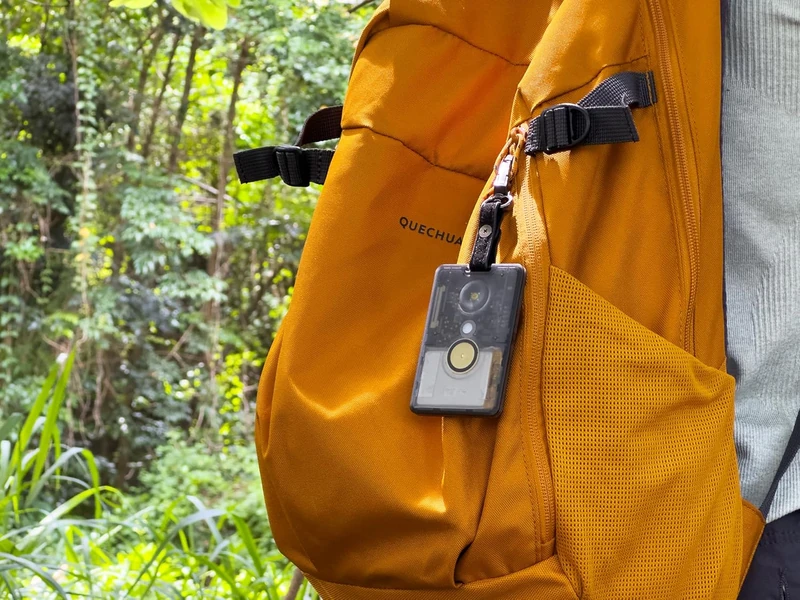
The SenseCAP Card can be clipped to a backpack and connects to your phone with Bluetooth. Image: amazon.ca
While the products above are pretty plug-and-play and might work out of the box for some, there’s a huge ecosystem of DIY options for customizing, making and personalizing your own systems. If you’re interested in technical details about radio, and building your own hardware appeals to you, the rest of this article is for you!
Meshtastic vs Meshcore
Meshtastic and Meshcore are two implementations of the mesh radio concept. Fundamentally, they both bounce messages between multiple devices in order to reach a recipient who may be out of direct radio range.
- With Meshtastic, every device can re-transmit any message it hears in order to extend its reach. Because messages flood the mesh, the geographical structure of the nodes within can change - if one node moves out of range, another may take its place to deliver the message via an alternate path.
- With Meshcore, devices are explicitly assigned to one of two roles. Repeaters are geographically static, and will repeat any transmission they hear. They can’t send messages on their own. Companions are mobile, and used to send and receive messages. They can’t re-transmit messages.
Meshtastic is more flexible, especially when the mesh moves dynamically, such as a group on a hike. On the other hand, with many devices flooding the network by re-transmitting everything they hear, network congestion can become an issue for larger groups.
Meshcore trades some geographical flexibility for more efficient message routing. When repeaters are static, reliable message paths can be determined, reducing the need for flood messages. In practice, this allows for meshes that can span larger geographic areas.
I have tried both, and I found Meshcore to have a stronger, more focused community and better infrastructure in my area.
Build and Own Your Hardware
All the off-the-shelf products listed earlier share common components - a LoRa radio and a microcontroller that allows you to connect with your phone and send messages over the LoRa radio. The same is true for boards in a development form factor.
The most common LoRa radio is the SX1262. It operates at 22dBm (0.16W), but some hardware boards integrate radio amplifiers to bring this up to 28dBm (0.63W) or even 30dBm (1W - the maximum power allowed in Canada).
Boards I currently run:
- Heltec V3 : low cost ESP32-based, 22dBm. Not the most power efficient, but good for a hardwired HQ node that lives at home or your office and communicates directly with a nearby repeater. If I were starting again I’d probably go straight to the Heltec V4.3 instead of the V3.
- Heltec T114 : based on the nrf52, this radio is much more efficient than ESP32 radios, making it great as a portable companion. It also has a much sharper screen than the Heltec V3 but still only runs at 22dBm.

Heltec V3 running Meshtastic. You can flash Meshcore to this board as well.
I’ve also ordered the higher power boards below.
- Heltec V4.3 : Nearly equivalent to the V3 but boosted to 28dBm (0.6W) for basically the same price. Make sure you get the V4.3 version - the V4.2 board had hardware issues related to receiver sensitivity . Buying a V4.3 direct from Heltec guarantees you don’t get old stock.
- Heltec T096 : A new release, with 28dBm (0.6W) and additional integrated GPS. I’m looking forward to getting the T096 - it could be perfect for a small yet capable solar node or handheld.
- RAK 1W : At 30dBm (1W) it’s one of the most powerful boards available. I’m planning to build a solar-powered, minimal maintenance rooftop node that will expand Meshcore into my area.
With development boards, you can decide how to build your own power and antenna systems.
A Note on Antennas
Powering on a board without an antenna attached will burn the LoRa transceiver! This is because the radio energy has nowhere to go, and instead is reflected back into the device. The device does not like this.
If your hardware is from a kit, it probably came with a poor quality antenna. For good performance, you should consider buying an UF.L to SMA adapter cable, and a half-wave SMA whip antenna. If you’re planning to build an outdoor node, you can buy UF.L to SMA adapters with O-rings. Consider also N-Type connectors and antennas, which are designed to be more durable against the elements.
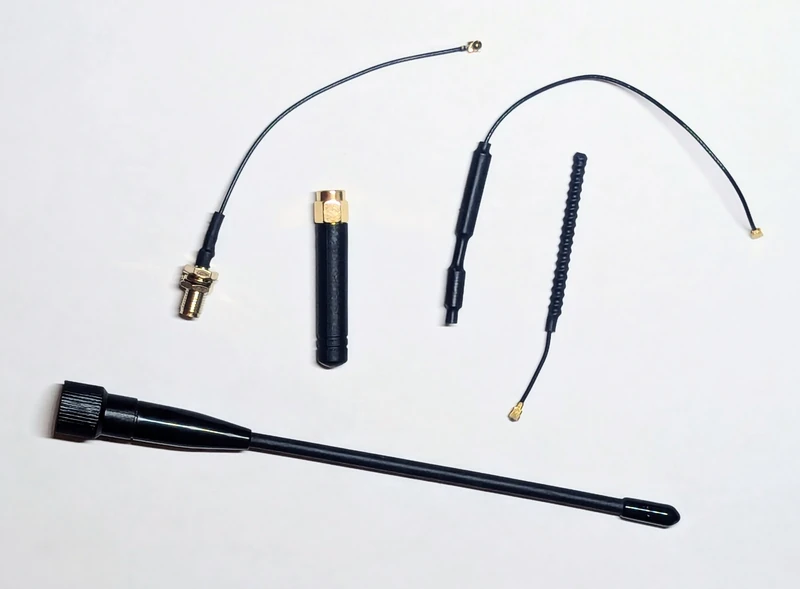
From top left to right: a UF.L to SMA adapter, an SMA ‘stubby’ antenna, and two poor-quality kit antennas. Bottom: half-wave antenna for 915MHz.
Keep any coax cable as short as possible. At these low power levels even “low-loss” coax longer than a decimetre can have a noticeable negative impact on power output.
Ensure your antenna is tuned to the specific LoRa frequency range in your region . You can test how well your antenna will transmit at a given frequency by using a Vector Network Analyzer (VNA) and checking for the Standing Wave Ratio (SWR) - the ideal antenna is near 1 but most antennas land within 1.5 and still work fine. Not all antennas are created equal! I bought 3 “identical” antennas online, but one of them had much worse SWR than the other two.
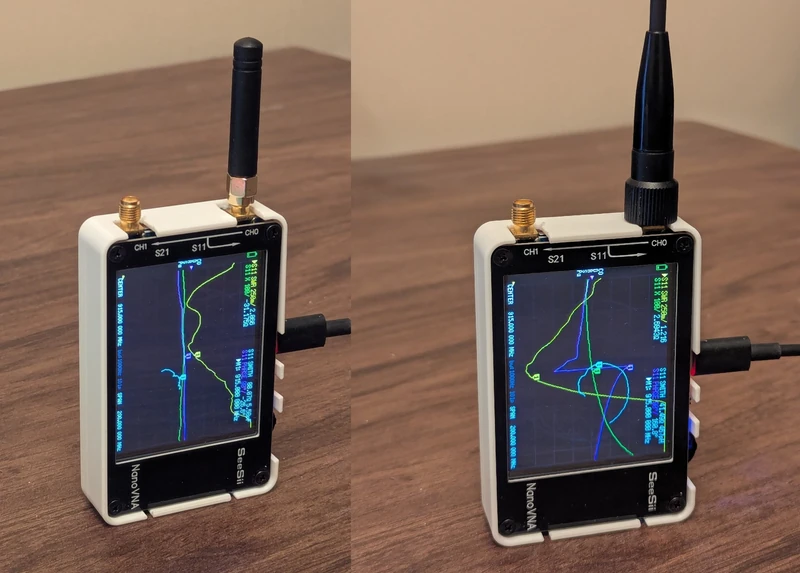
The stubby is not an effective radiator, coming in with SWR ~2, compared to the half-wave antenna that comes in at nearly 1.1.
Setting Up Your Node
The power level allowed for unlicensed broadcast at LoRa frequencies is 1W or less, depending on your region. This is quite low, relative to what an amateur radio operator may be used to. Therefore, it’s less possible to achieve good contact through brute-force power output.
The best predictor of success for reception is line-of-sight. This means you’ll get best results by setting up your antenna as high up and with as large of a view as you can. The website SCADACore has a cool utility for visualizing topographical line-of-sight between two points .
Avoid mounting antennas horizontally. Imagine a doughnut, with the antenna sticking up through the hole. The further the edge of the doughnut the stronger the emitted radio signal. With the antenna pointing up (doughnut in eating orientation), you get good 360 degree coverage. With it horizontally (doughnut in rolling orientation), most of your radio energy is directed into the ground and sky. Wikipedia has a good image that demonstrates the radio energy distribution of a monopole antenna , though I don’t know why you’d need it considering visual power of my doughnut analogy. Also, radios can hear each other better when their antennas are in the same orientation (due to polarization).
Also avoid placing the antenna next to other metal, especially if it’s grounded. Other metal will absorb or distort the radio energy pattern.
Basic “Weather Resistant” Design
You’ll find many designs online for outdoor nodes. Some are 3D printed, others use off-the-shelf weatherproof enclosures. What do you do if you want to get started right away and don’t have anything like that?
If it looks silly, but it works… well, it may still be silly. But it does work.
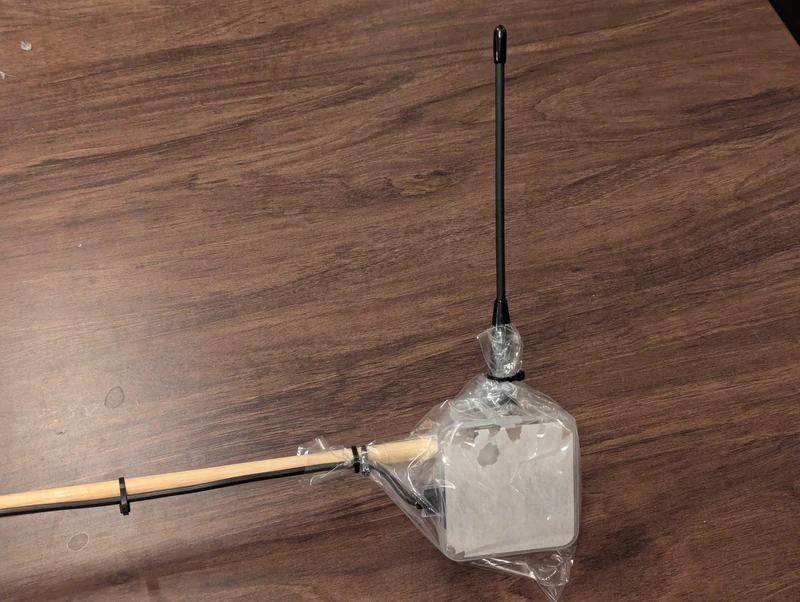
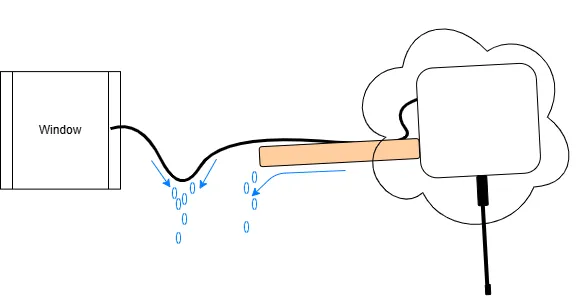
Well, the little box the device comes in kinda works? I drilled some holes to zip tie it to a horizontal pole mount, drilled more for the SMA connector and USB cable, and then slipped it into a small plastic sandwich bag. An elastic band or zip tie closing up the bag completes the build. The USB cable runs through my balcony window into a power supply in my living room.
It’s pretty sketchy, and probably won’t hold out the weather for long, but I’ve had two of these nodes on my balcony for a few weeks now, and they have survived a few rainy days.
Create natural points where water can pool and fall off, rather than having it run into the node or your window.
It works best if you mount it antenna-down, and make sure that the transceiver is slightly angled upwards from the mounting point so that water doesn’t run down the stick into the bag. Finally, putting a dip in the cable just before it enters your window will prevent water from running along the cable and dripping inside your house.
Projects
Like any good hobby, once you get into it there are many possible paths and projects you can explore. Here’s a few that are on my list.
3D Printed Handheld and Base Station Nodes
I printed a body for a Heltec T114 to be my mobile Meshcore companion device.
I’ve delegated a Heltec V3 to be my Meshcore home base station. It works alongside the repeater out on the balcony to receive public messages reliably, regardless of if I have reception on my handheld. It’s hard-powered, but also has a small rechargeable battery that gives about a day of use if unplugged.
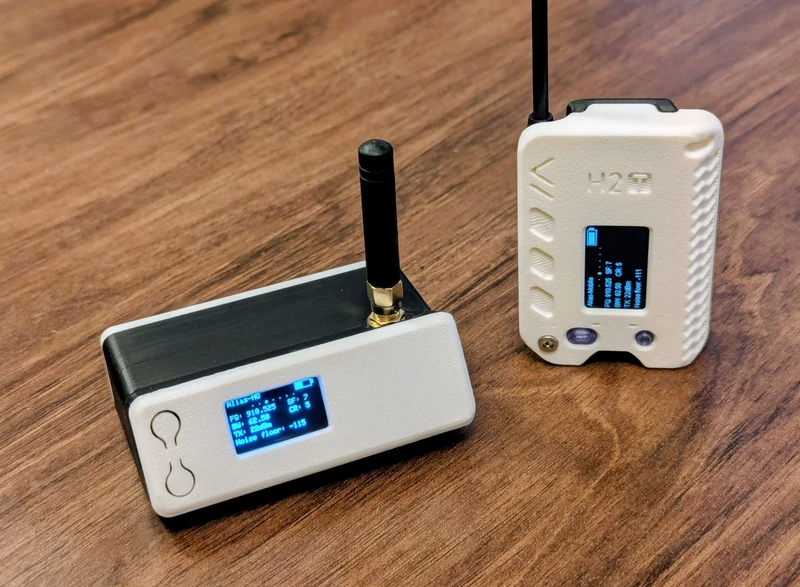
The designs in this photo are the H2T and the Bender , available on Printables.
Weatherproof DIY Solar Mesh Node
Sandwich bags are not known for their long-term resistance to the elements. I also still need to have my window cracked open to run power to the nodes, and I don’t know how much longer my wife Joyce will tolerate the tripping hazards while she’s gardening.
A small solar panel (1-5W) can be sufficient to run a repeater node indefinitely, in combination with rechargeable batteries. Some boards, such as the Heltec T114 or T096, have solar power input and battery charge controllers built directly onto the board.
A proper weatherproof setup and a solar panel allow installation in more remote areas, and can help you and your community maintain a communication channel even in the event that severe weather affects the power grid in your area.
Use caution when running lithium-ion or lithium-polymer batteries, as they can fail spectacularly if overcharged, overheated, or short-circuited.
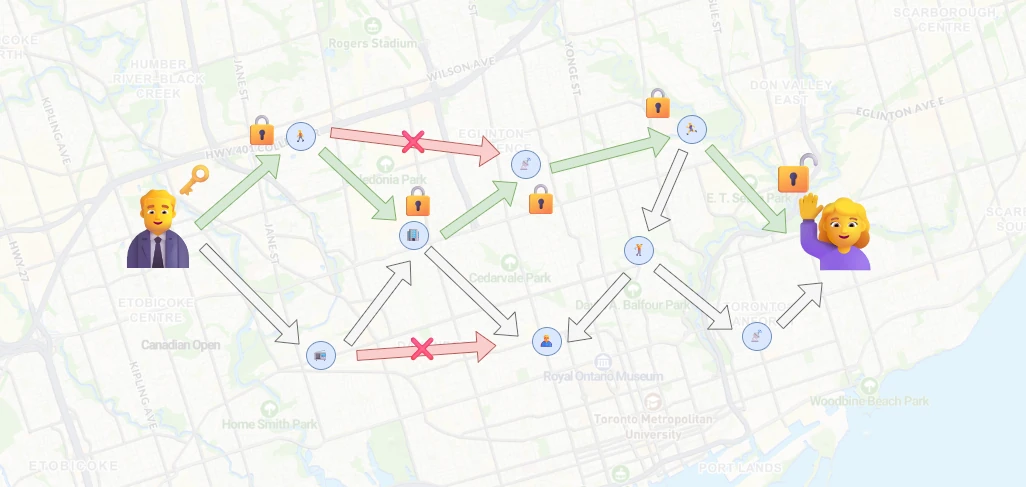
Camping or Wilderness Mesh Networks
When I go camping, I’m usually at the edge of, or outside of cellphone reception. This makes it difficult to communicate with friends, and also tends to drain my phone battery as it struggles to try to connect to the cell network.
Next time I go camping, I’ll hang a battery-powered repeater node from a tree, and give companion nodes to my friends. We should be able to keep our phones on airplane mode to preserve battery, yet remain in contact over long distances via the mesh.
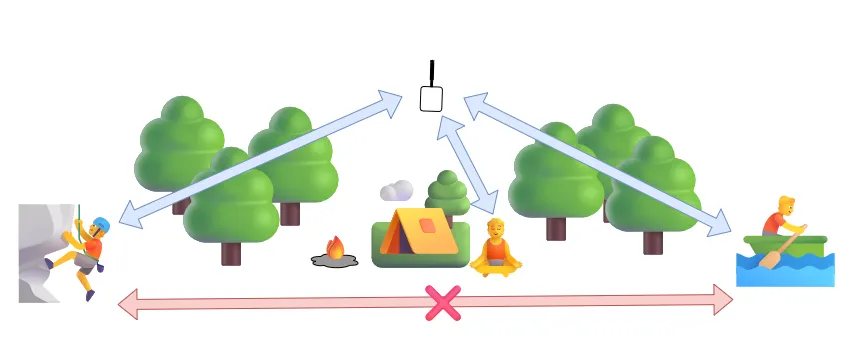
A central mesh node can allow people to communicate (blue) even if they are out of direct radio range (red). Yes, those are emojis. What, did you think I was going to use AI?
This seems like a good use-case for Meshtastic’s store-and-forward mode , and Meshcore’s room servers , where a limited number of messages can be asynchronously retrieved by a client node that may have been out of range at the time they were sent.
If a base station or repeater device isn’t available, Meshtastic’s ad-hoc routing is naturally suited for a mesh where participants move. Meshcore users can enable client repeat mode which does the same thing. Note that client repeat mode uses a secondary frequency so you’ll be disconnected from normal mesh repeaters while it’s active.
Mesh Transceiver as a Drone Payload
Few radio towers can beat the line-of-sight achieved by zip-tying a transceiver to a drone - that is, if you only need it for the 20 minutes that the drone battery lasts. Zip-tying nearly anything to a micro drone powerful enough to lift the transceiver (e.g. a Mavic Mini) might push the takeoff weight over 250g, so in Canada you’d need a small basic drone operations license . If you land the drone on a structure to enable longer mesh operations, ensure you have permission from the property owner.
Avoid mounting the transceiver on the bottom of the drone if it has downward facing collision sensors, as the drone may interpret this as an obstacle and prevent you from descending. Avoid covering any sensors when zip-tying for the same reason.
“Wardriving” and Mesh Mapping
The Meshcore community has developed MeshMapper , which aims to document the reach of the Mesh network. Volunteers bring their nodes with them in their car, and the MeshMapper app automatically searches for repeaters and attempts mesh communications along their journey. It’s a fun way to contribute to the mesh, even if you can’t run a repeater yourself. If you do run a repeater, valuable data showing the real-world range of your repeater will become available.

Green areas indicate strong reliable coverage. Most of the Toronto downtown core and much of central Mississauga is covered.
It’s really cool to see how connected my city of Toronto is!
Participating in the Community, and Expanding the Network
In the past, radio technologies and amateur radio groups have assisted in emergency situations where modern local communication infrastructure is overwhelmed or unavailable. As a more mundane example, in 2022, the major Canadian telecom company Rogers experienced a service outage that left 25% of Canada without internet connectivity for nearly a day.
Some envision blanketing entire towns, cities, states, or even entire countries with a mesh communication network as a backup to primary services. Others just enjoy building nodes, testing new hardware, or just chatting with others on the public channel.
Share this article with a friend and get them into the Mesh! Search for groups in your area, or start one of your own. You may also have some luck if you talk to your local ham radio club.
Finally, both Meshtastic firmware and Meshcore firmware are open-source, meaning you can build upon and improve the code for everyone.
Conclusion
I hope this article has piqued your interest in this cool technology! There’s something that’s so intriguing to me about this little radio that can send and receive direct transmissions 10’s of kilometres away, using less energy than the LED in your TV remote. I also love that using this technology unveils a hidden world - the apartment you walk by every day might have a Meshcore repeater on the roof. With so many connections to other STEM hobbies like 3D printing, electronics, and more, there’s so much to uncover.
If you’ve gotten into the mesh, or are working on any projects, reach out to me ! I’d love to hear about it.