Unit Testing Your Embedded Code Directly In STM32CubeIDE
July 31, 2022 - 2255 words (9 mins)
Introduction
In this tutorial we’ll learn about how to make native unit testing easy for your embedded STM32 projects. We’ll start with a default installation of STM32CubeIDE - ST’s Cube-flavored distribution of Eclipse, and by the end of this article, you can begin writing unit tests or performing Test Driven Development on your STM32 project code directly in STM32CubeIDE.
Table of Contents
Benefits of Native Unit Testing For Embedded Systems
Why bother with unit testing on the development machine? Aren’t printf’s, debuggers, and on-target self-tests good enough?
The first advantage of native unit testing is speed. Cross-compilation is slower than native compilation, and flashing times increase as your codebase gets larger. Furthermore, in order to test a specific function you might need to manually bring the system into a particular state, set breakpoints, and examine outputs in the debugger. On an embedded system I worked on this build-flash-debug cycle could take between three and five minutes each time! Imagine realize you made a typo or a copy-paste mistake on the first line of the function and now you need to wait all over again.
Testing on target with the debugger is often not repeatable. It can be impractical to place the system in certain states, especially when dealing with edge-cases. With unit tests and loosely coupled code, you can craft isolated environments where you can initialize the system, inject specific inputs and review how the code reacts. You can inject rare or erroneous inputs that the real system may only seldom encounter. Every subsequent run will inject the same inputs and is not affected by any other tests.
Developing a system that can be tested on a native machine also improves your code by encouraging you to write in a loosely coupled and modular manner. In most cases, your unit testing won’t involve a full emulation of an RTOS or your microcontroller’s registers. This is a good thing - if the majority of your application code doesn’t rely on the specifics of those layers, you can more easily port the system to a new RTOS or microcontroller in the future.
The final benefit - it’s fun. It’s extremely satisfying to design code that snaps together like Lego, builds at twice the speed as the target compiler, and then runs hundreds of test cases in milliseconds. Having test cases reduces the anxiety of adding new features or refactoring, and the increased development speed reduces the anxiety of your looming deadlines.
Guide To Setting Up Native Unit Testing With STM32CubeIDE
This guide assumes you are working on Windows, and have STM32CubeIDE installed. If not, you can download it from ST’s website at https://www.st.com/en/development-tools/stm32cubeide.html .
Setting Up The Local Compiler
The easiest way to add a local unit testing configuration to an STM32 project is to create a native C/C++ project and use it as a template to create a build configuration in the STM32 project. We will use MSYS2’s package manager to download and install the MinGW64 C/C++ toolchain and GoogleTest libraries. If you already have a native C/C++ development environment installed, you can skip this section and download the GoogleTest library manually from your native toolchain’s repository.
Download and install MSYS2 from https://www.msys2.org/
. When installed run the MSYS2 shell (if it doesn’t open after installation, you can find it by searching “MSYS2 MSYS” in the Start Menu). Run the command pacman -Syu , which will start the first of two stages required to bring the package manager up to date. Allow the package manager to install the packages. Between stages, the terminal window will prompt you to close and manually reopen the terminal by clicking on the MSYS2 MSYS start menu or desktop icon. Complete the setup by running pacman -Syu a second time and accepting the package download when prompted.
Once MSYS2 is fully updated, you can begin installing the required development packages. Run the following command to install basic unix-like commands, the MinGW compiler and the GoogleTest libraries.
pacman -S base-devel mingw-w64-x86_64-toolchain mingw-w64-x86_64-gtest
Other packages and libraries you want can be installed later and will be made automatically available to the compiler.
Creating the Donor Project
Open STM32CubeIDE into a new or existing workspace.
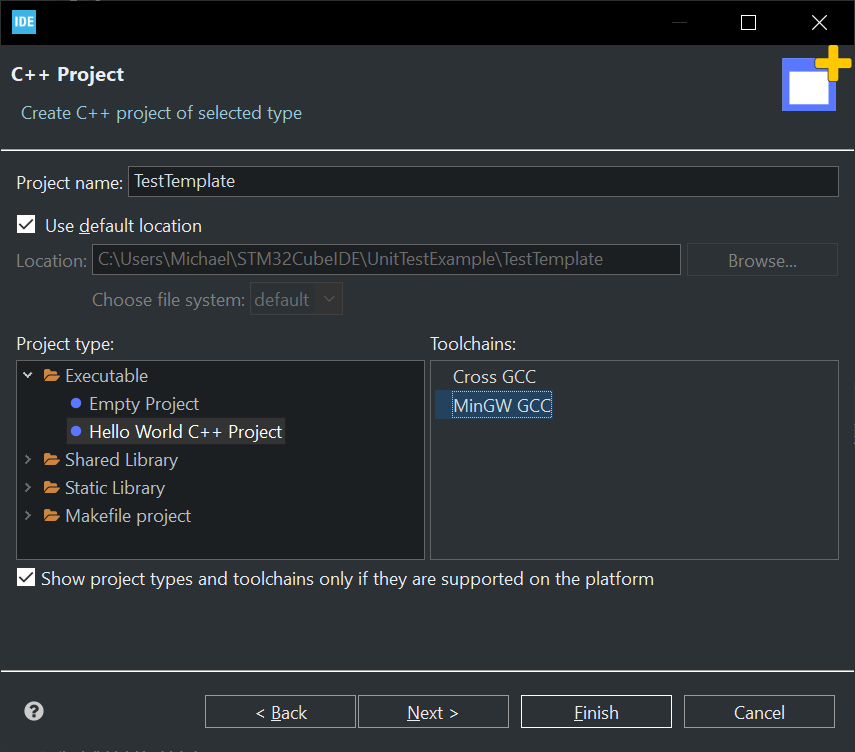
From File→New→C/C++ Project, create a new C++ Managed Build project. On the next page, name it TestTemplate, select the Hello World C++ project type and use the MinGW GCC toolchain. The hello world project will let us make sure that our compiler is working;
Once created, verify that the project builds properly by right clicking the project in the Project Explorer and clicking Build Project. The output should appear as below.
21:07:39 **** Rebuild of configuration Debug for project TestTemplate ****
Info: Internal Builder is used for build
g++ -O0 -g3 -Wall -c -fmessage-length=0 -o "src\\TestTemplate.o" "..\\src\\TestTemplate.cpp"
g++ -o TestTemplate.exe "src\\TestTemplate.o"

21:07:41 Build Finished. 0 errors, 0 warnings. (took 1s.647ms)
Finally, click the dropdown next to the run icon in the menu bar and click the local C++ executable option.
!!!Hello World!!!
We are now ready to use this project as a template to build local C++ unit tests and files.
Integrating the Test Configuration From the Donor Project
Create or import an STM32 Project you would like to write unit tests for. In the filesystem root (in Explorer, not STM32CubeIDE), create two folders - one called Common and another called Testing. The Common folder is for unit testable (i.e. modular, loose-coupled, and cross platform) code and the Testing folder for the unit tests, doubles and mock objects. In STM32CubeIDE refresh the project so that the new folders appear - if they still don’t appear after a refresh, you may have to drag them from explorer into the project hierarchy and link them manually (this is the case with most TouchGFX application template projects).
Double check that the STM32 project and the TestTemplate project are both in the same workspace. Right click the STM32 project in the Project Explorer and then click Build Configurations → Manage… → New.
Create a new configuration with the name UnitTest, and in the “Copy settings from” section, select “Import from projects” then select the debug configuration of the TestTemplate project (this way the unit tests will have maximum debugging and no optimizations by default).

Click OK. Back in the Manage Configurations Window, select the new UnitTest configuration and click Set Active, then click OK.
Setting Up The Unit Test Configuration
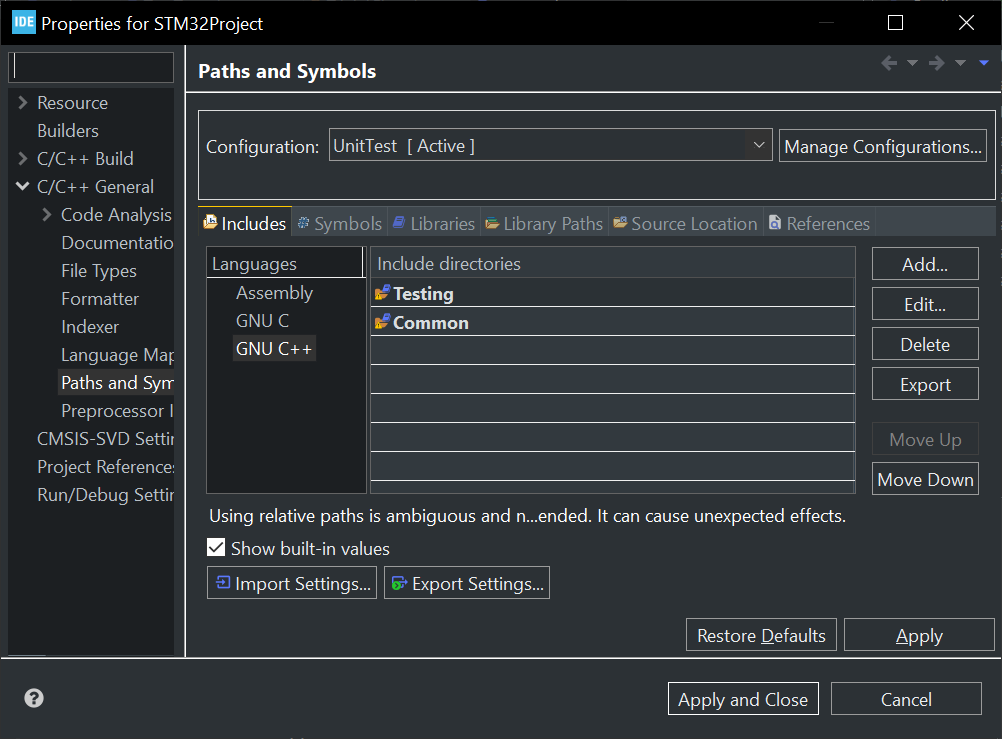
Right click the STM32 project and click Properties, then in the sidebar select C/C++ General → Paths and Symbols. Ensure that the UnitTests configuration is selected at the top of the dialog box. In the Includes tab, click Add, and then add include paths for Common (apply to all languages and all configurations) and Testing (apply to all languages only).
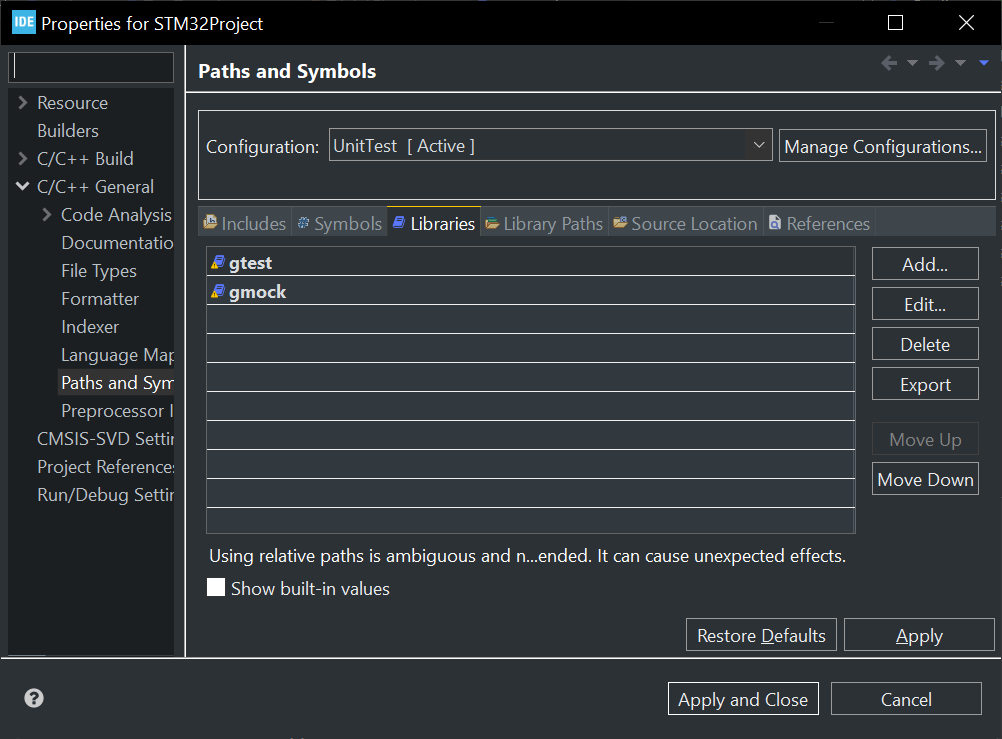
In the Libraries tab, add entries for gtest and gmock.
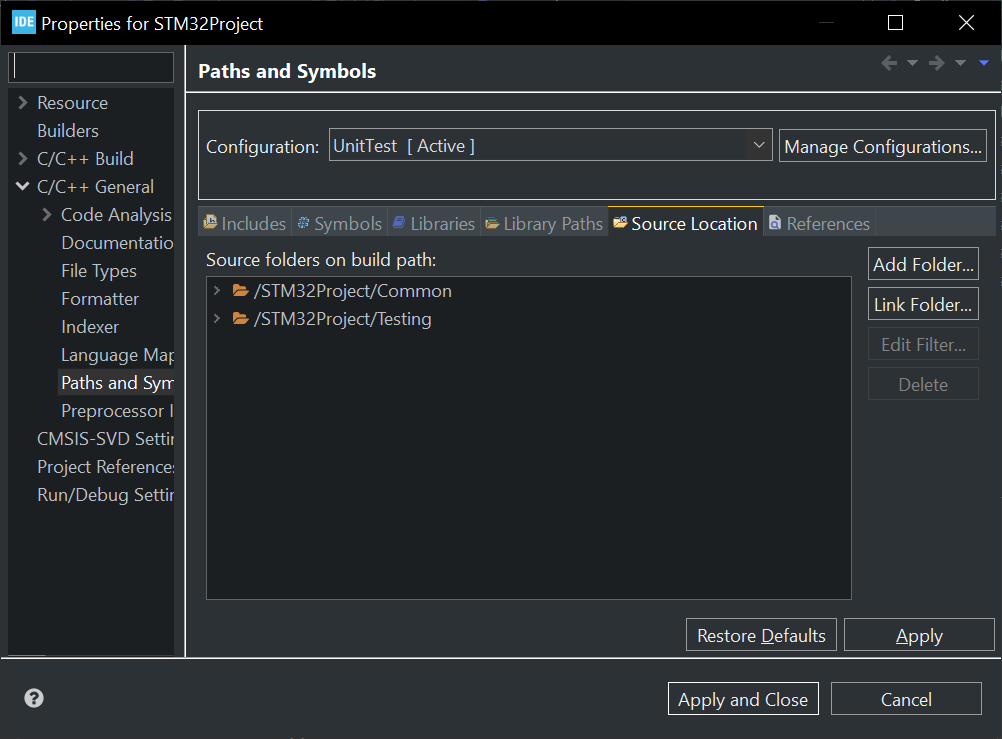
In the Source Location tab, remove the (STM32ProjectName)/src filter, and add a filter for the Common and Testing folders.
Click OK to close the windows.
Building And Running Tests
In the Common folder, we’ll create a header-only class that could represent loosely coupled code that is also used in our STM32 project.
1/* Common/TrivialClass.hpp */
2class TrivialClass {
3public:
4	bool returnsTrue() { return true; }
5	bool returnsFalse() { return false; }
6};
In the Testings/ folder create a file called test_main.cpp, and copy the code below. The main method sets up the GoogleTest framework, and runs a trivial passing and failing test.
 1/* Testing/test_main.cpp */
 2#include "gtest/gtest.h"
 3#include "TrivialClass.hpp"
 4
 5int main(int ac, char* av[])
 6{
 7  testing::InitGoogleTest(&ac, av);
 8  return RUN_ALL_TESTS();
 9}
10
11TEST(BasicTest, PassingTest)
12{
13	TrivialClass t;
14	EXPECT_TRUE(t.returnsTrue());
15}
16
17TEST(BasicTest, FailingTest)
18{
19	TrivialClass t;
20	EXPECT_TRUE(t.returnsFalse());
21}
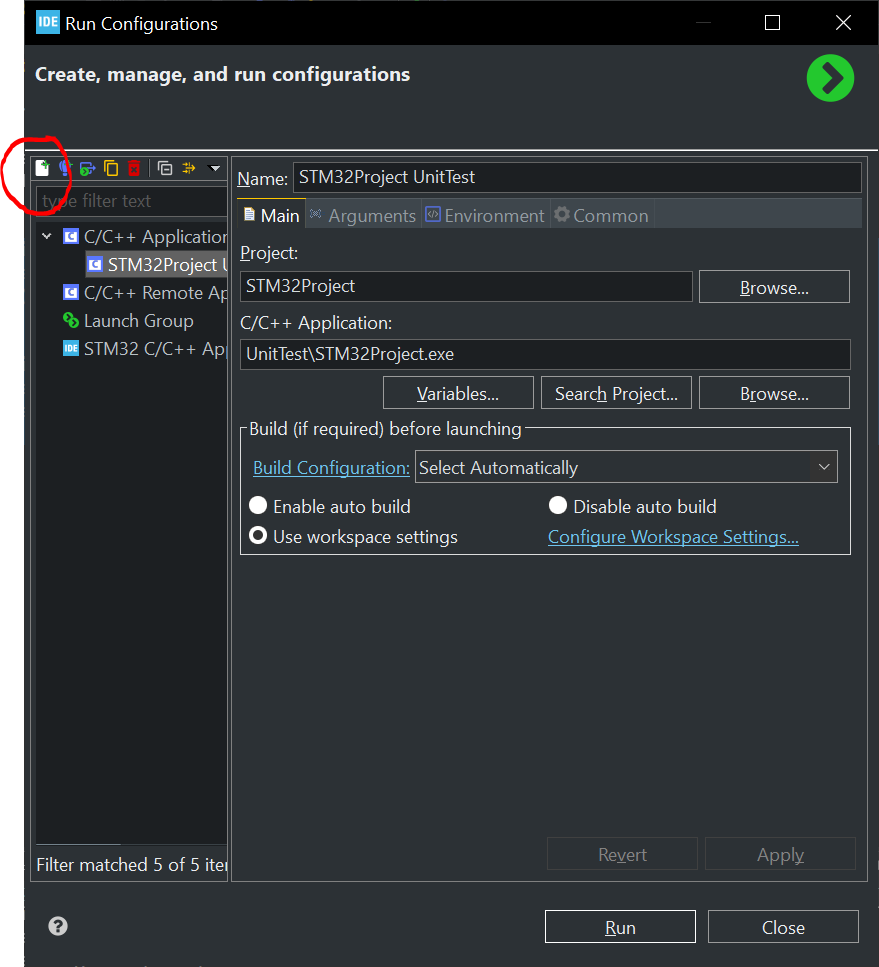
Right click the STM32 project and click Build Project. Assuming the build passes, right click the project again → Run As → Run Configurations. Highlight C/C++ Application and then tap the New Configuration button. Leave the settings as default and click Run.
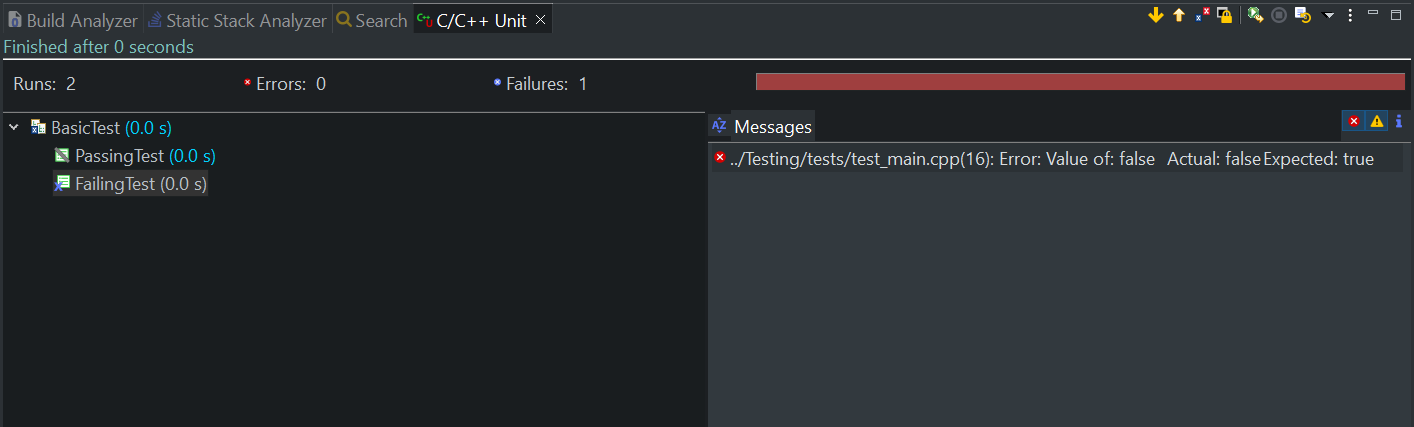
If all goes well, you should see the following in the console:
[==========] Running 2 tests from 1 test suite.
[----------] Global test environment set-up.
[----------] 2 tests from BasicTest
[ RUN      ] BasicTest.PassingTest
[       OK ] BasicTest.PassingTest (0 ms)
[ RUN      ] BasicTest.FailingTest
../Testing/tests/test_main.cpp:19: Failure
Value of: t.returnsFalse()
  Actual: false
Expected: true
[  FAILED  ] BasicTest.FailingTest (0 ms)
[----------] 2 tests from BasicTest (0 ms total)

[----------] Global test environment tear-down
[==========] 2 tests from 1 test suite ran. (0 ms total)
[  PASSED  ] 1 test.
[  FAILED  ] 1 test, listed below:
[  FAILED  ] BasicTest.FailingTest

 1 FAILED TEST
Because we deliberately wrote a passing test and a failing test, this is the output we expect.
If you’d like, you can try running the program using the debugger by clicking the dropdown beside the debugger icon in the menu bar and selecting the UnitTest executable.
Congratulations, you’re ready to begin unit testing or test driving your code right in STM32CubeIDE!
Cleaning Up and Next Steps
The last thing we need to do is ensure that we include our Common folder and exclude our testing directory when we are building for the STM32 target. Switch back to the Debug configuration, then open the project properties and navigate to C/C++ General → Paths and Sources. Select the Debug configuration. In the Source Filter tab, verify that the Testing directory isn’t on the list, but that Common, Drivers, Middleware, and any other target-specific folders are. In the Includes tab make sure that the Common folder is appended to the end of the existing list, but that Testing is not. Finally, the gtest and gmock entries should not be in the Libraries tab. Repeat these instructions for the Release configuration.
You can remove or close the TestTemplate project at any time if you wish.
As you begin writing loosely coupled and unit-tested code, place the source and header files in the Common folder where it is accessible to, and compiles nicely for both the unit tests and the target system.
I might make a future article that covers how I write loosely coupled, modular code that works great with unit testing. For now, I recommend the following resources:
- Test Driven Development for Embedded Systems by James Grenning
- Embedded Artistry: Musings on Tight Coupling Between Firmware and Hardware
- GoogleTest Primer
Fun Extras!
Use the C/C++ Unit Testing Plugin
The Eclipse CDT repository has a C/C++ Unit Testing Support plugin that ties into test runners like GoogleTest, and displays the output a little bit nicer than a console message. That can be installed by clicking Help → Install New Software, selecting the CDT repository in the “Work with” dropdown, and installing C/C++ Unit Testing Support from the CDT Optional Features section.

Once installed, open the project’s Run Configuration dialog. Select C/C++ Unit in the sidebar, then click the New Configuration button. In the C/C++ Application section, click the Search Project button and select the executable created by the Unit Test build. Finally, in the C/C++ Testing tab, select the Google Tests Runner from the dropdown. Click the Run button, and the C/C++ Unit tab will appear and display the test results.
Regular Testing With A Key Combination
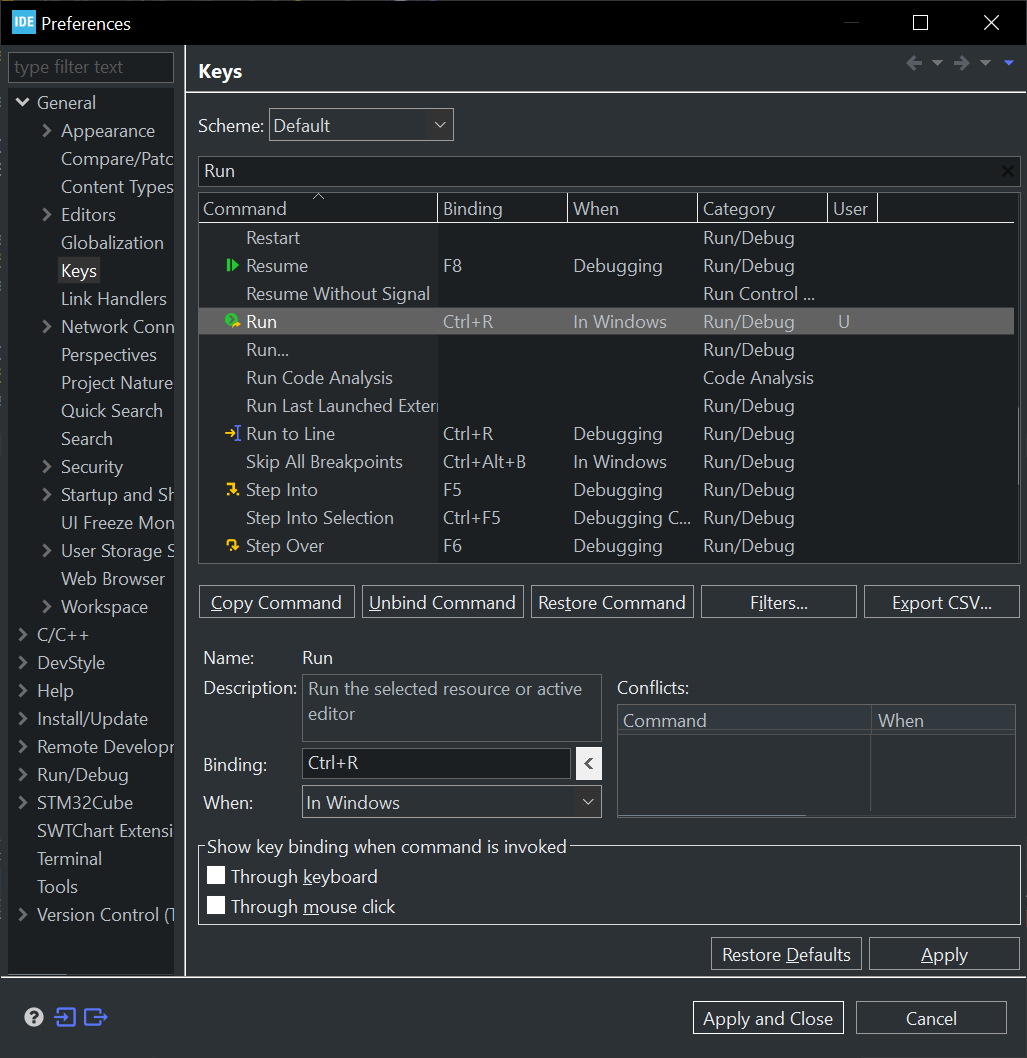
A key benefit of writing code with Test Driven Development is that there is a tight feedback loop between writing code and testing it. Running tests regularly can help you spot bugs before they become masked. The best way to ensure that you remember to run tests regularly is to make it really easy to do. I like to assign a keyboard shortcut (such as Ctrl-R) to the Run command. When I hit the key combination my file changes are saved, the program builds, and the unit tests are run automatically.
To set this up, from the menu click Window → Preferences. Select the Keys submenu from the General section and search for “Run”. Select it and add your binding by clicking the Binding control and typing your desired key combination.
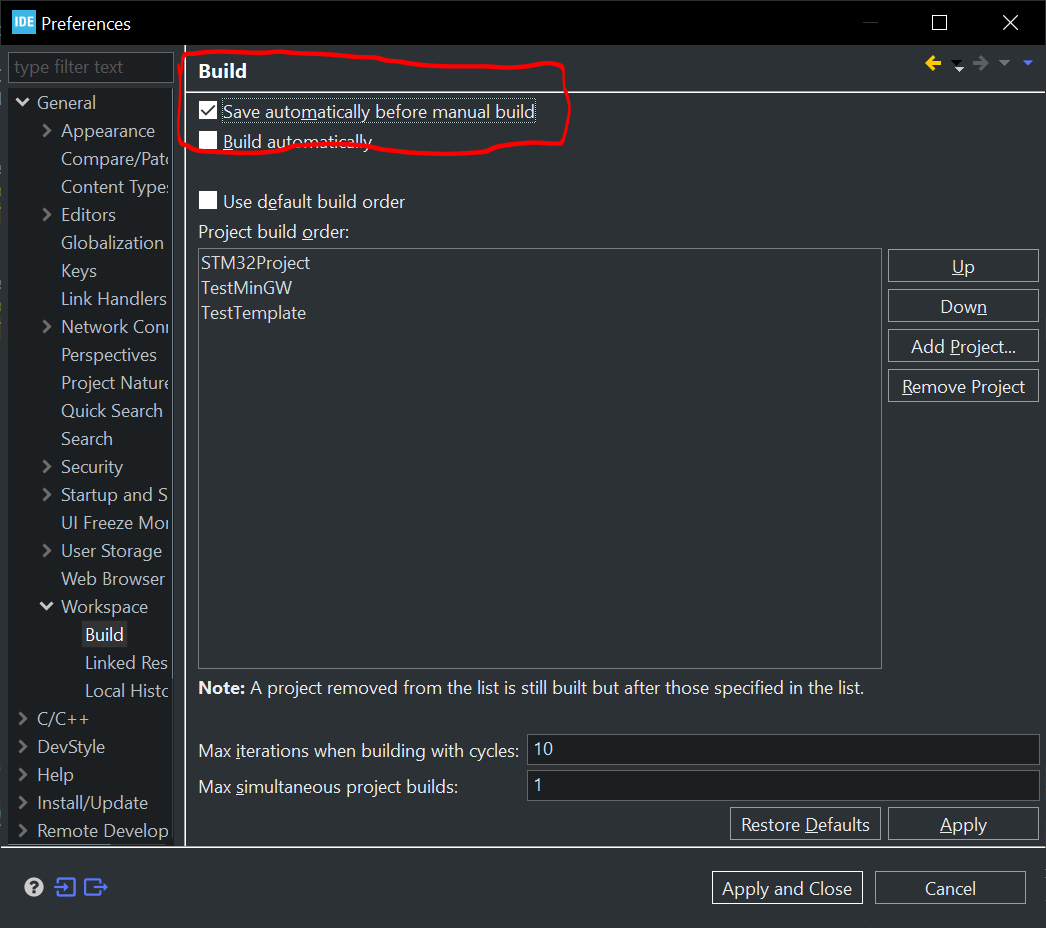
Next, in the General/Workspace/Build tab, check the box that says “Save automatically before manual build”.
Finally, in the “Run/Debug”/Launching tab, in the Launch Operation section (near the bottom) check the radio button that says “Always launch the previously launched application”.

Now when you press the key combination, your project will save, build and run the unit tests immediately. If the key combination started the run configuration for the console output and you wanted it to run the C/C++ Unit plugin configuration instead, manually run the C/C++ Unit plugin configuration from Run menu. STM32CubeIDE will remember that and run that configuration after the key combination in the future.
Conclusion
Unit testing on your native development machine is a great way to improve your embedded system development. It promotes modular code design, it is faster than target compilation, flashing and debugging, and it allows you to perform repeatable tests. In this article we explored how to set up the STM32CubeIDE to easily run unit tests against loosely-coupled STM32 project code.
Thank you for reading. I hope you found this article useful! I’d love to hear your thoughts or questions about this article - you can reach me on social using the links in the footer below.
Happy testing!