Version Control for KiCAD PCB Projects
December 16, 2022 - 2877 words (12 mins)
In this tutorial, we’ll explore a method for organizing multiple revisions, creating backups, and allowing teams to collaborate effectively on PCB and schematic designs.
Table of Contents
What is Version Control?
Version control is like a file time machine. As you edit files, you can create checkpoints - known as commits - along the way. Later on, you can travel back in time and return to a previous commit. You can also review who changed a file and what they did.
Why should you use a version control system for your PCB designs? Isn’t it enough to archive old PCB revisions in a folder or create new files for each revision?
A version control system provides structure and organization to manage perhaps hundreds of revisions. Without the need to create multiple files and manually maintain backups, your project folder remains clean and organized. Production files are conveniently available but are unambiguously separated from development files.
A version control system allows effective collaboration by providing mechanisms to prevent data loss when multiple people try editing the same files. Further, any team member can check-out, review and edit the project if they have shared access to a repository.
Using a version control system is safer because you only modify your own local copy of the project. The entire history of the project is safely stored elsewhere. If you make a big mistake or corrupt a file, you can easily restore to the last commit. With this safety net, you can afford to take risks to solve circuit or routing problems without worrying that your previous work will be lost.
There are a few different options for version control systems, but I’ve found Subversion (SVN) to be useful and practical in a production environment, particularly because of its ability to enforce locks on files - we’ll learn more about these shortly.
Guide to Setting Up Version Control for your PCB Designs
Get Subversion
We’ll take a look at an example design process for a simple circuit and PCB using KiCAD, a powerful suite for schematic and PCB design. I’m assuming you have some background in KiCAD and have it already installed. To create and manage our SVN repositories we’ll use TortoiseSVN, a common GUI-based client for Windows that integrates nicely with the Explorer right-click menu. If you are using Mac or Linux, I’ve listed some SVN clients that appear similar (but I haven’t tested).
- Download TortoiseSVN for Windows: https://tortoisesvn.net/downloads.html
- Download SmartSVN for Mac: https://www.smartsvn.com/
- Download RabbitVCS for Linux: http://wiki.rabbitvcs.org/wiki/download
You can follow along with the command line - see the Appendix at the end of this article. You’ll need to first install SVN from Homebrew (Mac), your package manager (Linux), or by enabling the command line tools during TortoiseSVN installation (Windows).
Create and Setup A Subversion Repository
We’ll begin by creating a new SVN Repository. A repository is the database that stores information about file data, revision history, and various “rules” for the project. Make a new empty folder and name it BlinkyProject, then right-click the folder and click TortoiseSVN -> Create Repository Here. When prompted, click the “Create Folder Structure” button, then click OK to close all windows.
This repository folder only contains the raw database and not the actual files of your project, so don’t try and modify the files. Using the repository database, TortoiseSVN can create a local “working copy” folder. The working copy folder contains the actual project files. When project files are changed and committed, the working copy folder syncs information about the changes to the repository database.
Creating the working copy is known as “Checking Out” the repository. Right click on the repository folder, then click SVN Checkout. Change the working copy path to somewhere on your Desktop or Documents folder, if you wish. You can leave all the other settings the same and then click OK.
If you navigate into the working copy folder, you’ll see three folders - trunk, tags, and branches. Here’s briefly what we will use each folder for (don’t worry, each will be explained in the sections below).
- trunk: this contains all the living, in-development project files. Whenever you make fixes or edits to a schematic or board file, you’ll change the files in this directory.
- tags: this folder will contain “snapshots” of your project taken when you generate Gerber files for production.
- branches: miscellaneous boards based on tagged snapshots that may be customized, e.g for panelling.
There’s nothing special about these folders or their names, they are just SVN convention. You could rename them to something like “development”, “production”, and “variants” if you wanted.
Revision Tracking
Let’s explore SVN version tracking. Create a new KiCAD project inside the trunk folder, unchecking the box that says “Create a new Folder for this Project” so that project files are placed directly in the trunk. Open the .kicad_sch file and draw a simple circuit, such as a battery, resistor, and LED.
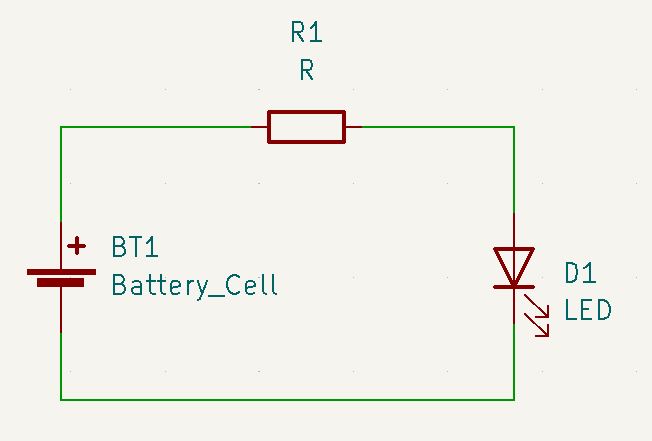
Our humble LED circuit
Our masterpiece is complete! Let’s commit our changes. Save and close the schematic, then right-click into the trunk folder, then click SVN Commit. Normally you would enter a brief message about your changes into the commit description section. For this commit write “Initial Commit”. Check the boxes next to the .kicad_pro, .kicad_pcb, and the .kicad_sch files in the area below to ensure they are included. Click OK, and the data will be sent to the repository database.
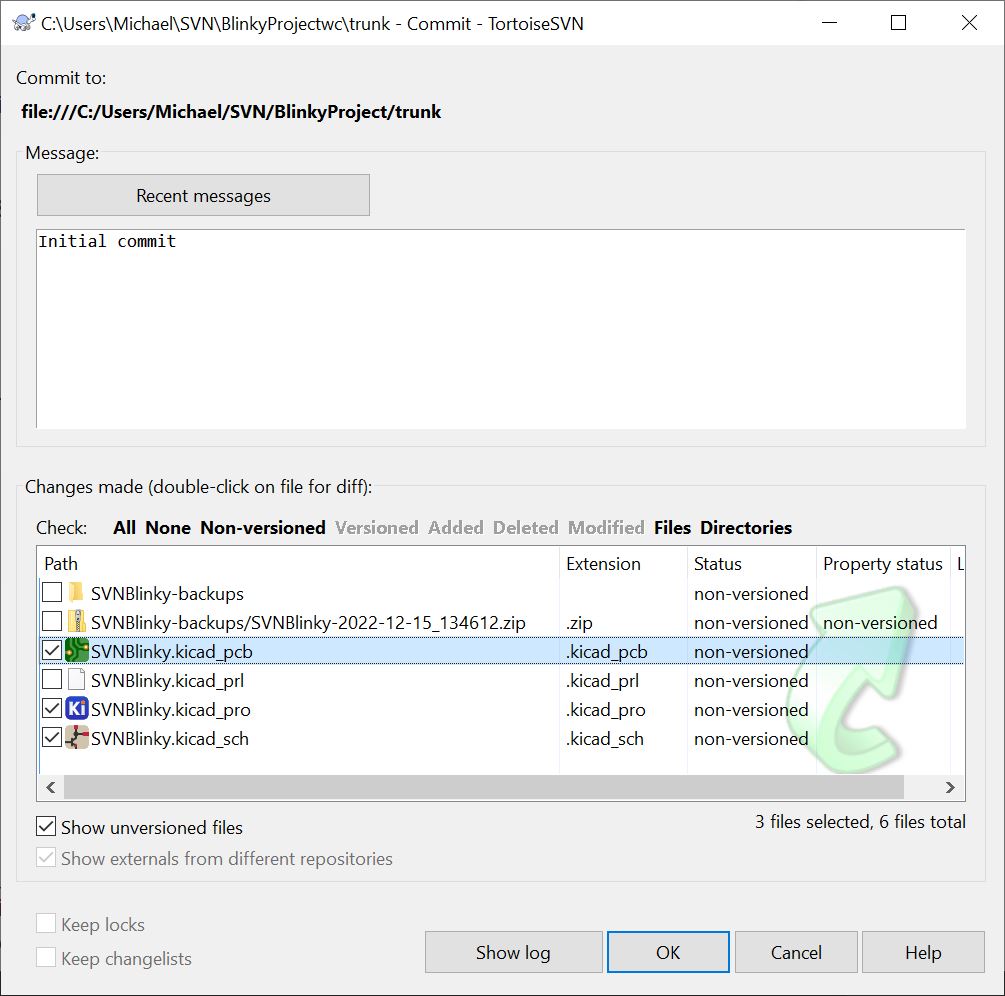
Making our first commit to the SVN Repository
We didn’t check off the backup folder or the .kicad_prl file. This means that any changes to the files in the backup folder or the .kicad_prl file will not be captured during commits, nor will they appear when anyone else checks out the SVN repository. This is okay - we don’t need to store their changes in the repository because the .kicad_prl will regenerate, and the backups are only for short term use if KiCAD crashes and we forgot to save. Our commits will take care of backing up major changes.
Let’s say our requirements changed and we actually need two LEDs. Update the circuit now to add a second resistor and LED and when finished, save and close the file. Commit again, as described above.
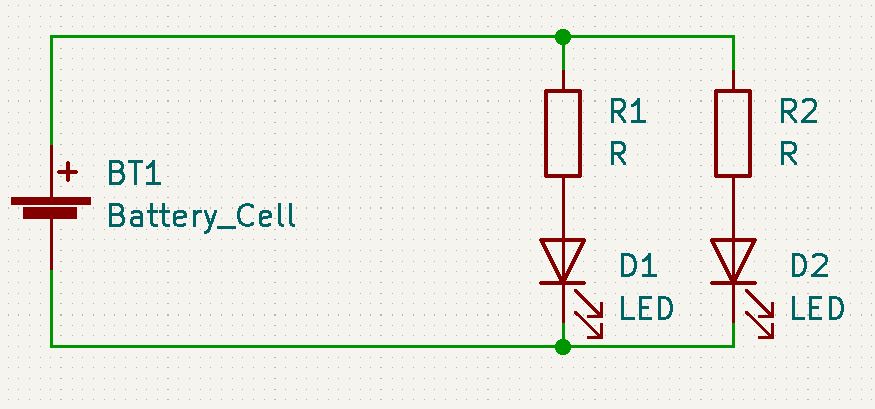
Gasp, a second LED?!
At any time, we can review the entire history of our project by right-clicking the folder of interest, then clicking TortoiseSVN -> Show Log. By right-clicking a revision entry and clicking Browse Repository, you can open the files as they appeared at that point in history. Try opening the repository of revision 2 and viewing the .kicad_sch file. You should only see one LED present. If you would like to revert a file to how it appeared in a previous revision you can click the file, then right-click the revision and click Revert to Revision. If you open the schematic file from the file explorer, you’ll see the file is back to one LED.
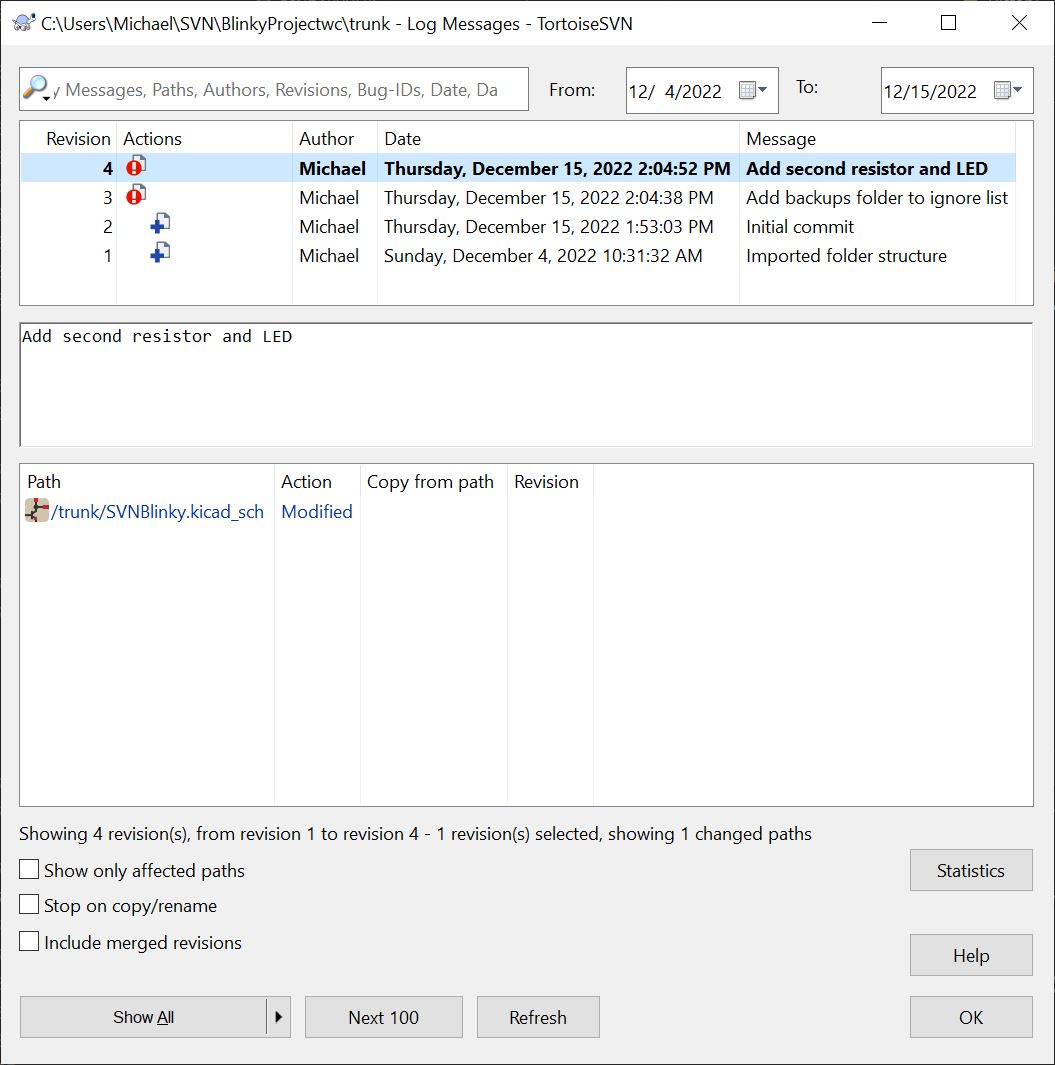
A list of all the changes made to the trunk directory.
Commits cost nothing, so it’s better to commit more often than less, creating checkpoints as you work. If you mess up and don’t know how to get back to your original state or you ran out of undos, you can always restore your last known-good commit.
When committing, remember to write descriptive change messages because - as we’ll soon see - trying to figure out what changes were made based on file differences alone is a major hassle.
File Locks and Collaboration
When multiple software developers work on the same file simultaneously, they can merge their changes together later. If the changes were in different sections of the file, merging is easy - both changes are incorporated. When multiple authors change the same lines however, a merge conflict occurs but can be resolved by rewriting the section of code in a way that maintains each change as required.
As PCB developers, we lack the critical tool that software developers take for granted here - the ability to read file differences to comprehend changes. To illustrate, right-click the .kicad_sch file and click TortoiseSVN -> Diff with Previous Version. Notice how a simple change - adding a second LED and resistor - created a file difference that is almost incomprehensible.

I was worried such a trivial change wouldn’t cause a diff convoluted enough to demonstrate my point, but I had no reason to fear. Unless I stared at it too long.
If you are working on a project alone and on a single computer, things are simple - you know that only you are editing any particular file at a time, so no merges are required. However, if you are collaborating with others and multiple people try editing the file, the result is effectively ‘all or nothing’. Because merging multiple changes in the traditional way is impractical, you could be forced to keep one version, and discard the other. I hope you’re good at rock-paper-scissors.
Luckily SVN has a tool to prevent this situation - enforceable file locks. When you enforce a lock on a file, it becomes read-only by default. You must “take” the lock before you can edit the file. If another collaborator has already taken the lock, the file will remain read-only. Otherwise the file becomes exclusively yours to edit. When you commit, the lock is (optionally) released, and others can work on it again.
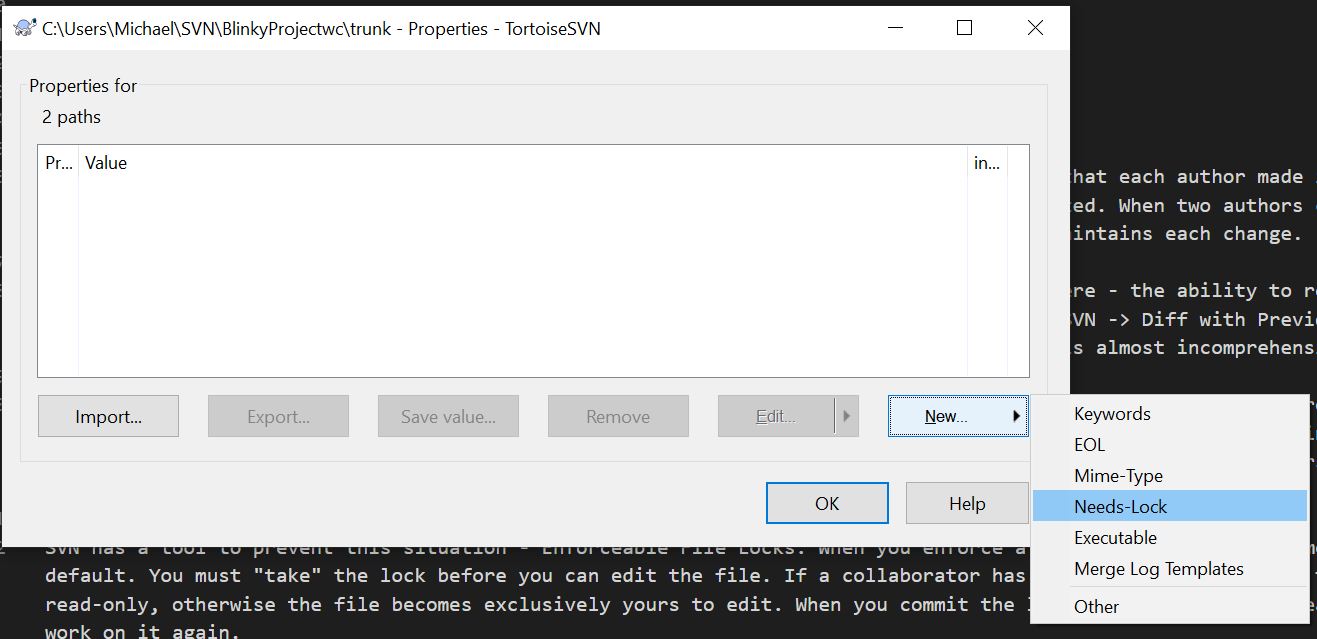
I recommend enforcing locks on the .kicad_sch and .kicad_pcb files. Taking a lock on one won’t automatically take a lock on the other, which is fine because in most cases the PCB and schematic can be safely edited simultaneously by different people. To enforce a lock, select the .kicad_sch and the .kicad_pcb file, then right-click and click TortoiseSVN -> Properties. Click the arrow next to New, then click Needs-Lock, and check Locking Required, finally click OK to close all windows. Right-click and click SVN Commit to push the property change to the repository.
Enforcing locks on the .kicad_pcb and .kicad_sch files will prevent other collaborators from opening the file at the same time, reducing the number of arguments about who has to do all their work over again.
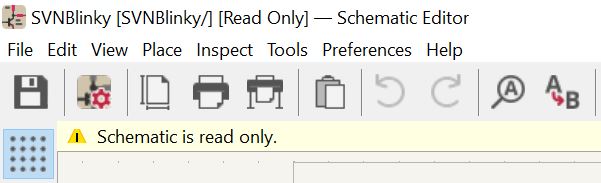
Notice now that if you open the .kicad_sch file, KiCAD now informs you that it is read-only. Close the file, then right-click it and select the new option SVN Get Lock. Enter a message - this will appear to anyone else that tries to take a lock on the same file - then click OK.
It’s helpful to notice this before starting to make changes to the file, but if you don’t KiCAD will still let you save without forcing you to re-open the file if you take the lock later.
Well, well! The requirements changed again. You managed to take the lock before Bob (you want to impress the senior designer), so the file is yours to edit. Add a third LED, then finish the design by annotating and assigning footprints.
We’ll create the PCB now. Take a lock on the .kicad_pcb file, then open it and arrange the footprints, then connect them with traces and draw a closed shape around them on the EdgeCuts layer. Once you are happy, save and close the files, and commit them.

One of my best :')
In the commit message window, you’ll notice an checkbox near the bottom left that says “Keep Locks”. If unchecked, the lock will be released after committing, but check the box if you plan to make more commits.
In rare cases, such as when Bob takes a lock but then goes on vacation (again) you can “steal” the lock. The lock transfers from Bob to you, but now you’ll have to figure out what happens when he returns and realizes he can’t commit his changes.
Tags and Production Revisions
One of the worst feelings is when your board arrives in the mail and after trying to debug it you realize the schematic or PCB files on your computer don’t quite match up. Perhaps you accidentally submitted an old Gerber file, or you made changes to the design files since submitting it for manufacturing. Even if you can access the Gerber files sent to the fab, they are of limited use because they lack any schematic or part information.
With version control, we can commit before generating Gerbers, then always be able to return to that revision for debugging purposes in the future. However, it can be a pain to switch back and fourth between revisions, so we can use an SVN tag to archive a copy of the production run directly in the repository and always have it available for review. Having an official “snapshotted” copy for each board version produced is useful during board bring-up and debugging, RMA repairs, and may be helpful for design traceability and compliance with regulations.
Our Blinky board is ready to be sent for fabrication. Right click on the trunk folder and click TortoiseSVN -> Branch/Tag. Change the ‘To path’ option to “/tags/V1”, and enter a message such as “snapshot production revision V1”. The tag has now been created, but you have to right-click the tags folder and click SVN Update for the new files to appear.
We will now generate Gerber files directly from the tag instead of the trunk. Having a Gerber folder alongside the development files in the trunk is dangerous - they don’t automatically update with the design and you can easily forget to regenerate them, leaving them out-of-date when you go to production. Open the .kicad_pcb file and click File -> Plot. Enter a path for the Gerbers, then click Plot. Click Generate Drill Files, then click Generate Drill File in the new window. Once you’ve reviewed the Gerber files with GerbView, run SVN Commit once more, making sure to check the new Gerber folder and the new Gerber files to include them. Write a commit message, such as ‘Create production files for revision V1’, then click Commit.
I’m a sign, not a cop.
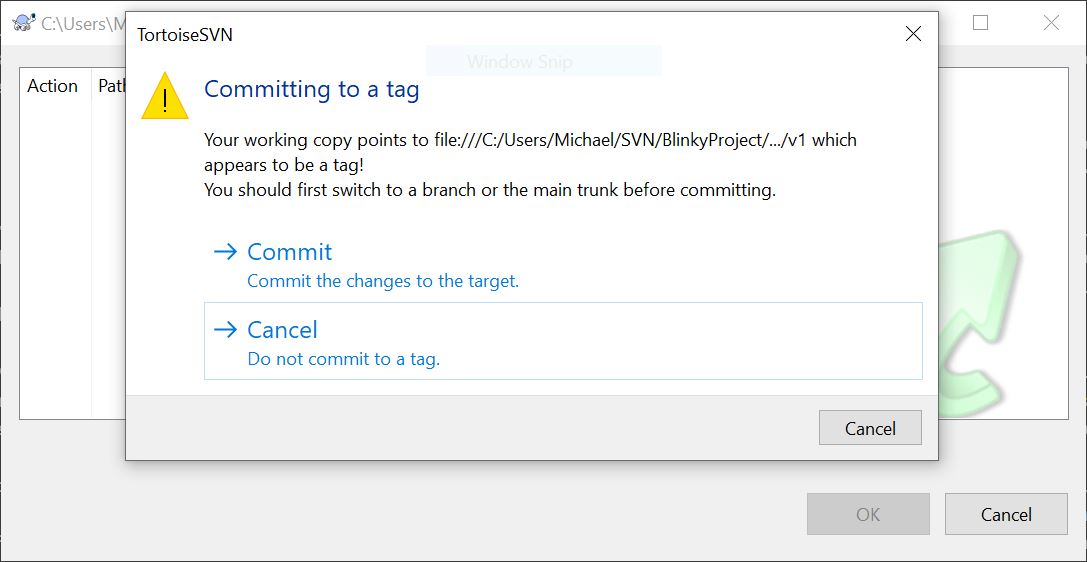
At this point TortoiseSVN will give you a warning about committing to a tag. By SVN convention, tags are read-only. We break this rule once to create production files, so click Commit now. If you see this warning at any other time take pause, as you may be trying to edit the tag folder instead of the trunk by mistake.
Now you are ready to submit the Gerber files to your PCB fabrication house of choice! At any point in the future, you can easily browse the files in this tag, which contains a guaranteed 1-to-1 link between the Gerber files and the schematic and pcb design files.
Branches for Manufacturing Variants
What if you need to panelize your boards before sending them for production? Panelizing boards often requires fancy PCB or Gerber editing, so it doesn’t really fit well with either the production revisions in the tags folder or the normal development files in the trunk folder. I recommend you use the branches folder to turn the production revision into a panelized board. Inside the branches folder create a new folder. Inside, create an empty .kicad_pcb and open it in standalone mode. Now you can append the board file from a tag and turn it into a panelized design.
Conclusion
In this article we’ve explored how to use the Subversion version control software with a KiCAD PCB project. After setting up the repository, we made some changes to the PCB and commit and saw how SVN tracks file history, and how you could review files as they appeared in the past. We also saw how SVN’s enforced file locks can help prevent conflicts or data loss if two people try to work on the same file at once. Finally, we took a snapshot of our project and created a tag to represent a production-ready revision, from which we derived the Gerber files.
Thanks for reading, and I hope you found this tutorial useful! Please feel free to reach out to me on the social links below if you have any comments or questions.
Appendix: SVN CLI Commands
| Operation | Command |
|---|---|
| Create a Repository | svnadmin create BlinkyProject |
| Checkout Repository | svn checkout file:///path/to/Project ./path/to/WorkingCopy |
| Manually Create Folder Structure | cd BlinkyProjectWorkingCopy; mkdir tags branches trunk |
| Stage Folders For Commit | svn add . --force |
| Commit Folder Structure | svn commit -m "Add folder structure" |
| Add KiCAD Project Files | cd trunk svn add *.kicad_pro *.kicad_sch *.kicad_pcb |
| Commit Single LED Circuit | svn commit -m "initial commit" |
| Commit Two LED Circuit | svn commit -m "add second LED" |
| Review SVN History | svn update svn log |
| Return File to Earlier Revision | svn merge -r (current rev):(past rev) Blinky.kicad_sch Commit: svn commit -m "reverted to older revision" OR Return to latest: svn revert Blinky.kicad_sch |
| Add Needs-Lock Property | svn propset svn:needs-lock '*' Blinky.kicad_pcb Blinky.kicad_sch |
| Commit Properties | svn commit -m "Add needs lock property" |
| Take Lock | svn lock Blinky.kicad_sch |
| Commit third LED | svn commit -m "Add another LED" |
| Create V1 Tag | svn copy . ../tags/V1 svn commit -m "Create V1 tag" |
| Add Gerbers and Commit | svn add Gerbers svn commit -m "Create production files for V1" |